다음과 같은 최신의 LAMP환경에서 워드프레스(WordPress)의 최신 버전인 5.21 버전을 HTTPS 환경으로 구축합니다.
2018년 4월 MySQL8.0 Release , 5.x계열보다 최대 2배 고속화 2018년 8월 RFC8446(TLS1.3 표준 사양) 발표 2018년 10월 APACHE httpd2.4의 TLS1.3 지원 2018년 12월 PHP7.3 및 WordPress5.0 Release
2019년 2월 26일 OpenSSL 1.1.1(b) Release 2019년 4월 1일 Apache httpd 2.4.39 Released 2019년 5월 2일 PHP7.3.5 Release 2019년 5월 21일 WordPress 5.2.1 Release
또한, 워드프레스(WordPress)를 고속화하기 위해서 Apache httpd2.4.39의 event MPM과 PHP-FPM을 이용해서 웹사이트의 속도를 향상하도록 구축합니다.
mysql Ver 8.0.16 for Linux on x86_64 (MySQL Community Server - GPL)
WordPress 5.2.1
CentOS 7 설치하기
아직 설치하지 않았다면 CentOS7 - OS설치하기 (1/10)를 참고하세요
[root@centos7 ~]# cat /etc/redhat-release
CentOS Linux release 7.6.1810 (Core)
환경 구축을 위한 개발 툴 설치
yum -y groupinstall base
yum -y groupinstall development
yum -y groupinstall network-tools
yum update
설치된 패키지들을 모두 최신 버전으로 업데이트해줍니다. (각자의 환경에 따라서 시간이 다소 걸릴 수 있습니다)
yum -y update
Apache httpd 2.4.39 설치 준비
Apache httpd2.4에 TLS1.3과 HTTP/2, 그리고 새로운 압축 알고리즘 Brotli에 대응하기 위하여 Apache httpd2.4 설치에 필요한 각종 라이브러리를 설치합니다. 또한 다른 글에서 다루게 될 CentOS7 - E-Mail 서버 구축하기(QMAIL) (5/10) 글을 위하여, Apache httpd2.4의 컴파일 시, Vpopmail의 웹 인터페이스인 Qmailadmin를 적용하기 위한 컴파일 옵션을 적용하여 설치할 예정입니다.
설치 준비 1: TLS1.3에 대응하기 위하여 OpenSSL 1.1.1 설치
Apache HTTP Server 2.4.39 이후 버전에서 TLS1.3을 적용하기 위해서는 OpenSSL 1.1.1 버전이 필수입니다.
How to upgrade OpenSSL on Centos 7 or RHEL 7 https://syslint.com/blog/tutorial/how-to-upgrade-openssl-on-centos-7-or-rhel-7
❶ OpenSSL 버전 확인
# 업데이트 전
[root@centos7 ~]# openssl version
OpenSSL 1.0.2k-fips 26 Jan 2017

# 업데이트 후
[root@centos7 ~]# openssl version
OpenSSL 1.1.1b 26 Feb 2019
OpenSSL 패키지 정보를 확인해 봅니다.
[root@centos7 src]# yum info openssl
Loaded plugins: fastestmirror, langpacks
Loading mirror speeds from cached hostfile
 * atomic: mirrors.hosting.in.th
 * base: ty1.mirror.newmediaexpress.com
 * epel: ftp.jaist.ac.jp
 * extras: ty1.mirror.newmediaexpress.com
 * remi-safe: ftp.riken.jp
 * updates: ty1.mirror.newmediaexpress.com
Installed Packages
Name        : openssl
Arch        : x86_64
Epoch       : 1
Version     : 1.0.2k
Release     : 16.el7_6.1
Size        : 814 k
Repo        : installed
From repo   : updates
Summary     : Utilities from the general purpose cryptography library with TLS implementation
URL         : http://www.openssl.org/
License     : OpenSSL
Description : The OpenSSL toolkit provides support for secure communications between
            : machines. OpenSSL includes a certificate management tool and shared
            : libraries which provide various cryptographic algorithms and
            : protocols.
cd /usr/local/src
 wget https://www.openssl.org/source/openssl-1.1.1b.tar.gz
 tar xvzf openssl-1.1.1b.tar.gz

 cd openssl-1.1.1b
 ./config --prefix=/usr/local/openssl-1.1.1b shared zlib

 make depend
 make
 make test
 make install
경로 인식이 안되면 아래와 같은 에러가 발생합니다. [root@centos7 lib]# openssl version openssl: error while loading shared libraries: libssl.so.1.1: cannot open shared object file: No such file or directory
HTTP/2(mod_http2)의 코어 엔진인 Nghttp2를 설치를 위하여 먼저 컴파일에 필요한 패키지를 설치합니다. ※ Nghttp2 is an implementation of HTTP/2 and its header compression algorithm HPACK in C. (https://nghttp2.org)
위 내용 미적용 시 에러 발생 : /usr/include/c++/4.8.2/bits/c++0x_warning.h:32:2: error: #error This file requires compiler and library support for the ISO C++ 2011 standard. This support is currently experimental, and must be enabled with the -std=c++11 or -std=gnu++11 compiler options.
cd /usr/local/src/
wget https://github.com/google/brotli/archive/v1.0.7.tar.gz
tar xvzf v1.0.7.tar.gz

cd brotli-1.0.7/
mkdir out && cd out

../configure-cmake

make
make test
make install
cd /usr/local/src/
wget http://ftp.jaist.ac.jp/pub/apache//apr/apr-1.7.0.tar.gz
tar xvzf apr-1.7.0.tar.gz
cd apr-1.7.0/

./configure

make
make install
APR-util
cd /usr/local/src/
wget http://ftp.jaist.ac.jp/pub/apache//apr/apr-util-1.6.1.tar.gz
tar xvzf apr-util-1.6.1.tar.gz

cd apr-util-1.6.1/

./configure --with-apr=/usr/local/apr

make
make install
드디어 Apache httpd2.4.39 버전을 설치합니다.
반응형
Apache httpd2.4 최신버전을 설치
❶ 최신 버전을 확인후 설치합니다.
Apache httpd2.4의 최신버전을 확인합니다.
https://httpd.apache.org/download.cgi
이제 HTTP/2, SSL/TLS, Brotli모듈 등을 활성화해서 설치할 예정인데, 이 웹서버는 큐메일도 운영되고 있습니다. 그래서 Qmailadmin을 사용하기 위해서 --enable-cgid라는 컴파일 옵션도 적용해서 컴파일하겠습니다. --enable-cgid : threaded MPM환경에서 CGI를 실행할 수 있도록 활성화하는 옵션 설치 후 httpd.conf 파일에서 cgid_module를 활성화시켜야 하는 작업이 더 필요하며 이 부분은 다른 글(CentOS7 - Web Server (Apache) 구축하기 (8/10))에서 다룰 예정입니다.
각종 패키지를 소스 컴파일해서 설치할 경우에, 모든 소스를 보관하고 컴파일하는 위치를 /usr/local/src로 사용합니다. 초기에는 없으므로 mkdir /usr/local/src 생성해 주시면 됩니다. (이미 많은 분들이 이렇게 하고 계시겠지만..) 그런 다음 해당 디렉터리 아래에 특정 패키지로 이동하여 ./configure --help 명령으로 컴파일 옵션을 확인할 수 있습니다. 나중에 재 컴파일해야 할 경우에도 매우 편리합니다. (참고)
[root@centos7 ~]# cd /usr/local/src [root@centos7 src]# cd httpd-2.4.39/ [root@centos7 httpd-2.4.39]# ./configure --help
vi /etc/yum.repos.d/remi.repo
[remi]
...
enabled=0
 ↓
enabled=1
remi-php73.repo
vi /etc/yum.repos.d/remi-php73.repo
[remi-php73]
...
enabled=0
 ↓
enabled=1
최신 버전이 아닌 PHP가 설치되어 있는 경우(PHP 5.6.x) Apache httpd와 연동이 안 되는 문제가 발생할 수 있습니다. 삭제 후 설치해도 문제 되지 않기 때문에 설치된 기존 버전을 확인한 후에 필요시 판단하여 삭제해 줍니다. ※ Migrating from PHP 5.6.x to PHP 7.0.x : https://www.php.net/manual/en/migration70.php
vi /etc/php.ini

expose_php = On
 ↓
expose_php = Off

;date.timezone =
 ↓
date.timezone = 'Asia/Tokyo'       # 'Asia/Seoul'

error_reporting = E_ALL & ~E_DEPRECATED & ~E_STRICT
 ↓
error_reporting = E_ALL & ~E_NOTICE
❸ PHP-FPM 설정합니다.
https://php-fpm.org 공식 홈에서, PHP-FPM : A simple and robust FastCGI Process Manager for PHP PHP-FPM (FastCGI Process Manager) is an alternative PHP FastCGI implementation with some additional features useful for sites of any size, especially busier sites.
PHP-MPM은 prefork, worker, event 이렇게 세 가지 종류가 있습니다. 그중에서 event MPM은 Apache2.4 계열부터 도입된 멀티스레드 & 멀티 프로세스 모듈이며 CPU와 메모리 사용량이 세 가지 중에서 가장 적은 모듈입니다.
php-fpm을 Apache httpd와 동일한 실행 유저/그룹에서 동작하도록 설정해줍니다. 기본적인 실행 유저는 daemon입니다.
vi /etc/php-fpm.d/www.conf

user = apache
group = apache
 ↓
user = daemon
group = daemon
Apache httpd2.4와 PHP-FPM이 동일한 서버에서 실행되고 있다면, TCP/IP 통신보다 속도가 빠른 UNIX 도메인 소켓을 경유하도록 설정합니다.
처음에 원본 설정 파일을 수정하면서 작성했으나 500 에러가 발생하면서 문제가 해소되지 않아, 별로의 httpd.conf 파일을 생성 후 작성했습니다. 어떻게 작성할 것인지는 여러분이 선택해 주세요. 원본 파일 위치 : /usr/local/apache2/conf/httpd.conf.org 또는 /usr/local/apache2/conf/original/httpd.conf
Include conf/extra/httpd-vhosts-00-anydeny.conf (skip) Include conf/extra/httpd-vhosts-10-service.conf Include conf/extra/httpd-vhosts-99-157.14.158.10.conf (skip)
httpd-vhosts-10-service.conf
[root@centos7 ~]# vi /usr/local/apache2/conf/extra/httpd-vhosts-10-service.conf
...

# 가상호스트 설정 -- 시작 --
<VirtualHost *:80>
    ServerAdmin admin@your-domain.com
    DocumentRoot "/usr/local/apache2/htdocs"
    ServerName your-domain.com
    ServerAlias www.your-domain.com

    <Directory "/usr/local/apache2/htdocs">
        #Options Indexes FollowSymLinks
    AllowOverride AuthConfig Limit
        Order allow,deny
        Allow from all
    </Directory>

    RewriteEngine on
    RewriteMap    lowercase       int:tolower
    RewriteCond   "${lowercase:%{HTTPS}}" !on
    RewriteCond   "${lowercase:%{REQUEST_SCHEME}}"        !https
    RewriteCond   "${lowercase:%{SERVER_PORT}}"   !443
    RewriteCond        "${lowercase:%{HTTP_HOST}}"     "^your-domain\.com$"
    RewriteRule ^(.*)$  https://www.%{HTTP_HOST}$1 [R=301,L]
    RewriteRule ^(.*)$ https://%{HTTP_HOST}$1 [R=301,L]

    ErrorLog "logs/error_log"
    CustomLog "logs/access_log" common
</VirtualHost>
# 가상호스트 설정 -- 끝 --

...
Apache httpd2.4.39용 systemd 서비스 파일을 작성합니다.
Apache httpd2.4.39와 PHP-FPM 서비스 파일에는 각각의 의존관계를 추가하여 작성합니다. ( 한쪽의 프로세스가 죽으면 나머지도 죽습니다. )
# 각자의 환경에 따라서 다르게 표시됩니다.
[root@centos7 conf]# firewall-cmd --list-all
public (active)
  target: default
  icmp-block-inversion: no
  interfaces: p1p1
  sources:
  services: samba http dns smtp smtps ssh https imaps   # << 여기에 http https 가 표시되면 OK!
  ports: 1999/tcp
  protocols:
  masquerade: no
  forward-ports:
  source-ports:
  icmp-blocks:
MySQL 8.0.16 설치
MySQL 데이터 파일을 백업합니다.
$ sudo cp -aR /var/lib/mysql/ /var/lib/mysql_bk/
MySQL5.x을 MySQL8.x버전으로 여러 번 마이그레이션을 시도했으나 실패했기에,
# yum upgrade mysql-community-server 실패
# libsasl2.so.2 이 라이브러리를 찾지 못해서 에러발생
[root@centos7 ~]# sudo yum upgrade mysql-community-server
Error: Package: mysql-community-server-8.0.16-2.el6.x86_64 (mysql80-community)
           Requires: libsasl2.so.2()(64bit)
 You could try using --skip-broken to work around the problem
 You could try running: rpm -Va --nofiles --nodigest

# 소프트링크를 걸어도 해결되지 않음
[root@centos7 ~]# ln -s /lib64/libsasl2.so.3.0.0 /lib64/libsasl2.so.2
[root@centos7 ~]# yum clean all   #  << 에러발생시 캐싱되므로 제거해 줌

# reboot후 다시 시도해도 실패!
[root@centos7 ~]# sudo yum upgrade mysql-community-server
여기서 소개하는 방법은 기존에 설치되어있던 MySQL 5.7 패키지를 모두 지운 후에 MySQL파일을 백업 후 MySQL8.x 최신 버전을 설치하는 방법입니다.
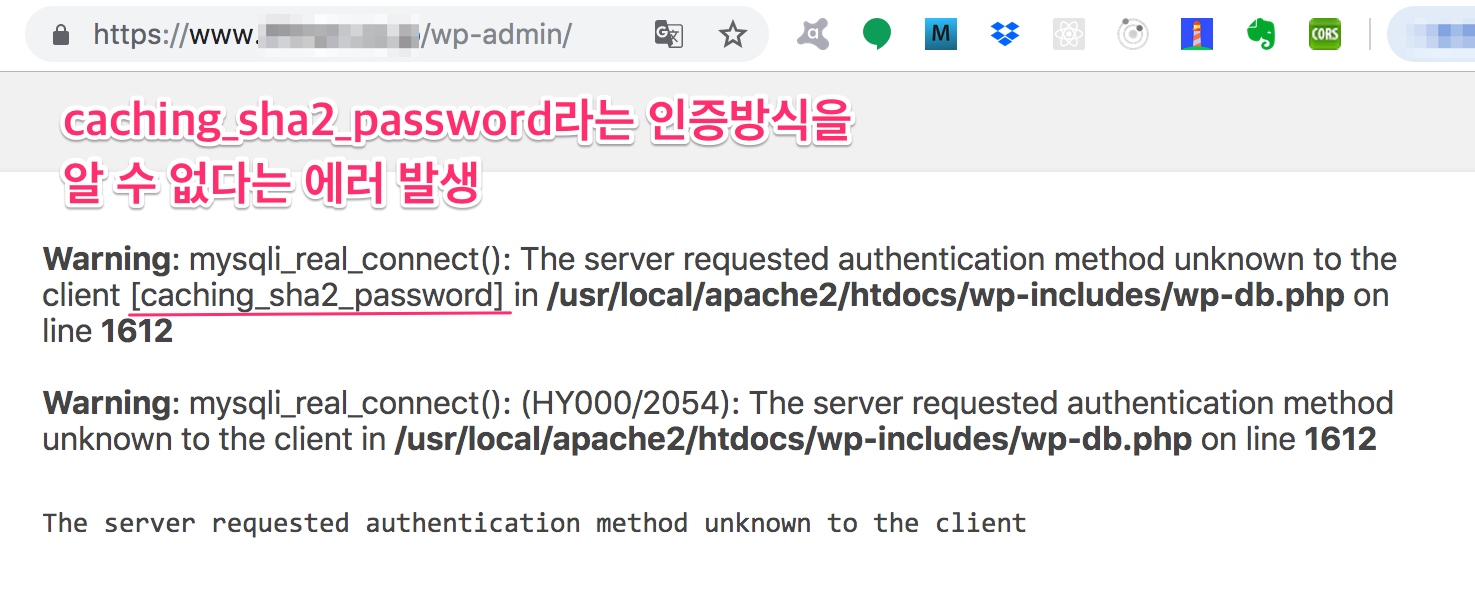
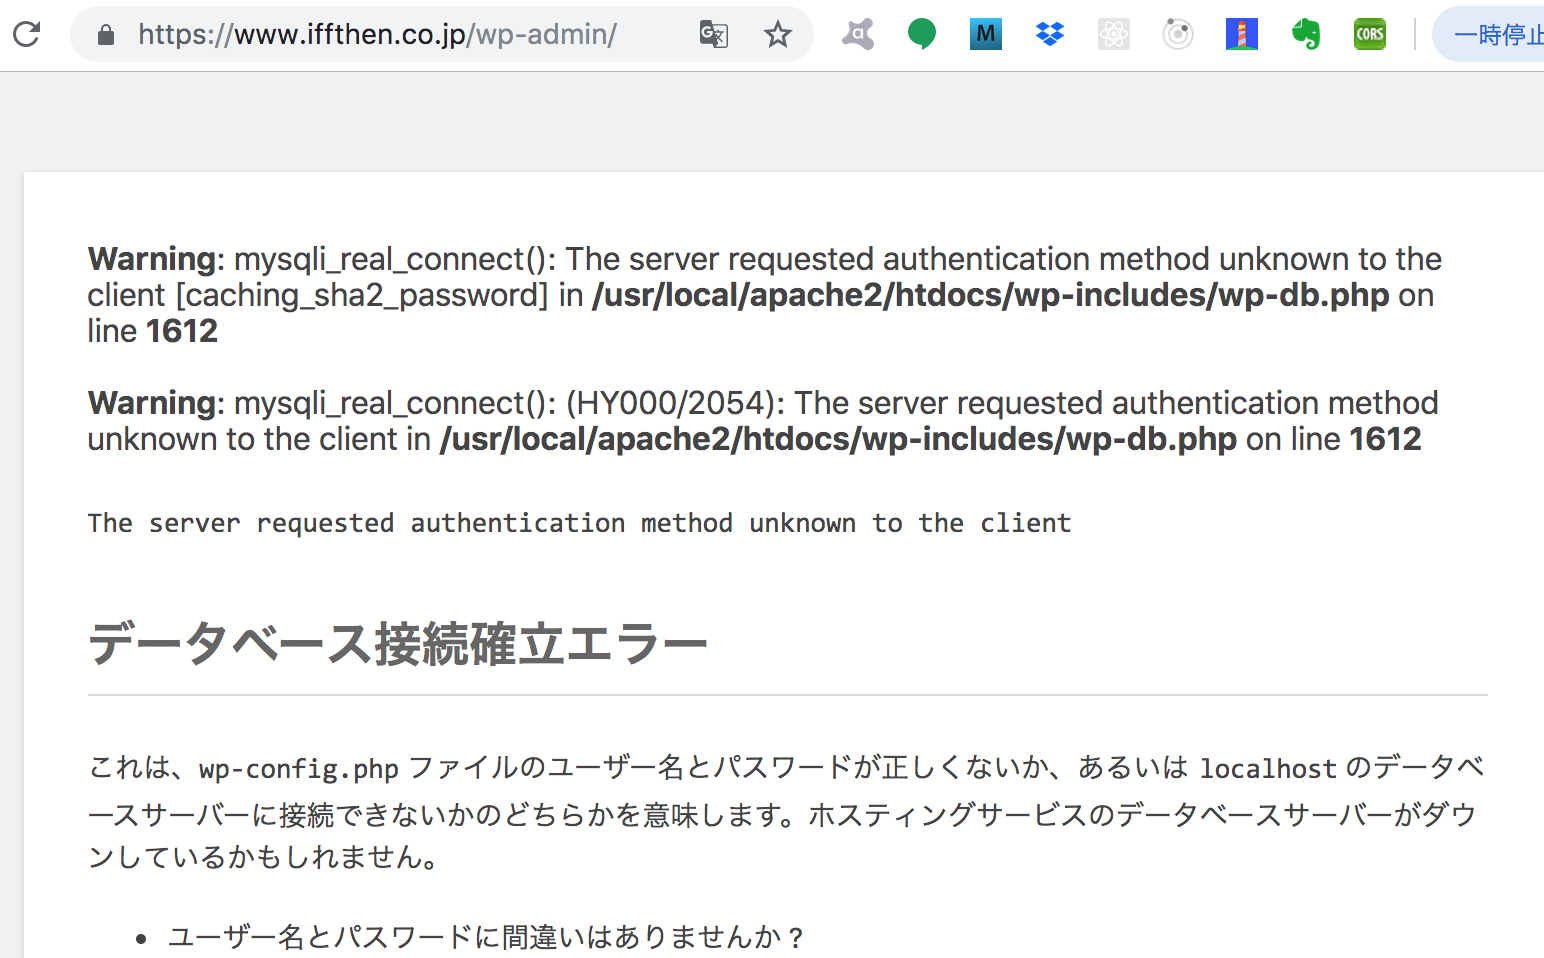
MySQL8.0부터 디폴트 인증 플러그인이 mysql_native_password ⇒ caching_sha2_password로 변경되었습니다. WordPress5.2.1 버전에서 caching_sha2_password를 지원하지 않기 때문에 디폴트 인증 플러그인을 mysql_native_password으로 변경해 둡니다.
※주의!! 만일, 이 변경 작업 전에 mysql -uroot -p 명령으로 DB에 접속해서 SQL문으로 워드프레스 유저를 생성했을 경우, caching_sha2_password 인증 프러그인이 적용되어 워드프레스(WordPress)설치 후 로그인이 안 되는 현상이 발생합니다. 이때는 DB에서 직접 SQL문으로 mysql_native_password으로 수정해주어야 합니다. (번거로움)
cacheing_sha2_password
[root@centos7 ~]# vi /etc/my.cnf

#default-authentication-plugin=mysql_native_password
↓
default-authentication-plugin=mysql_native_password
MySQL8.0을 기동하고 재부팅 시 자동 재시작하도록 설정해 둡니다.
systemctl start mysqld
systemctl enable mysqld
MySQL 설치 후 초기 설정하기
※ MySQL을 처음 설치할 경우에만 실행합니다. root 유저의 초기 패스워드는 그대로 사용하지 못하므로 변경해야 합니다. 아래의 명령으로 초기 패스워드를 찾습니다.
grep password /var/log/mysqld.log
초기 패스워드를 확인했으면 mysql_secure_installation 실행하여 패스워드를 변경합니다.
[root@centos7 ~]# mysql_secure_installation

Securing the MySQL server deployment.

Enter password for user root:     #   << 초기패스워드 입력

The existing password for the user account root has expired. Please set a new password.

New password:      #   << 새로운 패스워드

Re-enter new password:       #   << 한번더

VALIDATE PASSWORD PLUGIN can be used to test passwords
and improve security. It checks the strength of password
and allows the users to set only those passwords which are
secure enough. Would you like to setup VALIDATE PASSWORD plugin?

Press y|Y for Yes, any other key for No: y     #   << VALIDATE PASSWORD을 적용

There are three levels of password validation policy:

LOW Length >= 8
MEDIUM Length >= 8, numeric, mixed case, and special characters
STRONG Length >= 8, numeric, mixed case, special characters and dictionary file

Please enter 0 = LOW, 1 = MEDIUM and 2 = STRONG: 0    #   << 패스워드 강도를 선택
Using existing password for root.

Estimated strength of the password: 100
Change the password for root ? ((Press y|Y for Yes, any other key for No) : y        #   << root 패스워드 변경여부

New password:       #   << 위에서 설정한 password validation policy 레벨에 맞게 입력

Re-enter new password:        #   << 한번더

Estimated strength of the password: 50
Do you wish to continue with the password provided?(Press y|Y for Yes, any other key for No) : y       #   << 추가 설정 여부
By default, a MySQL installation has an anonymous user, a user account created for them. This is intended only for
testing, and to make the installation go a bit smoother.
You should remove them before moving into a production
environment.

Remove anonymous users? (Press y|Y for Yes, any other key for No) : y         #   << anonymous유저 제거
Success.

Normally, root should only be allowed to connect from
'localhost'. This ensures that someone cannot guess at
the root password from the network.

Disallow root login remotely? (Press y|Y for Yes, any other key for No) : y        #   << 원격에서 root유저 로그인 금지
Success.

By default, MySQL comes with a database named 'test' that
anyone can access. This is also intended only for testing,
and should be removed before moving into a production
environment.

Remove test database and access to it? (Press y|Y for Yes, any other key for No) : y         #   << 테스트DB 제거

Removing privileges on test database...
Success.
Reloading the privilege tables will ensure that all changes
made so far will take effect immediately.

Reload privilege tables now? (Press y|Y for Yes, any other key for No) :       #    y << privilege table을 리로드해서 변경된 내용을 적용
Success.

All done!
설치된 MySQL버전을 확인해 봅니다
[root@centos7 ~]# mysql --version
mysql Ver 8.0.16 for Linux on x86_64 (MySQL Community Server - GPL)
[root@centos7 ~]#
MySQL까지 설치가 끝났으므로 이제 Apache httpd2.4와 MySQL의 로그 로테이션 설정을 해 둡니다.
[root@centos7 ~]# logrotate -dv /etc/logrotate.d/httpd24
reading config file /etc/logrotate.d/httpd24
Allocating hash table for state file, size 15360 B

Handling 1 logs

rotating pattern: /usr/local/apache2/logs/*log after 1 days (60 rotations)
empty log files are rotated, old logs are removed
considering log /usr/local/apache2/logs/access_log
...
MySQL8.0.16의 로그 로테이션(logrotate.d)을 설정
vi /etc/logrotate.d/mysql80
/var/log/mysqld.log {
create 644 mysql mysql
notifempty
weekly
rotate 5
missingok
postrotate
if test -x /usr/bin/mysqladmin &&
/usr/bin/mysqladmin --defaults-extra-file=/root/.my.cnf ping &>/dev/null
then
/usr/bin/mysqladmin --defaults-extra-file=/root/.my.cnf flush-logs
fi
endscript
}
확인
[root@centos7 ~]# logrotate -dv /etc/logrotate.d/mysql80
reading config file /etc/logrotate.d/mysql80
Allocating hash table for state file, size 15360 B

Handling 1 logs

rotating pattern: /var/log/mysqld.log weekly (5 rotations)
empty log files are not rotated, old logs are removed
considering log /var/log/mysqld.log
log does not need rotating (log has been rotated at 2019-5-26 8:0, that is not week ago yet)
워드프레스(WordPress)의 최신버전을 압축을 푼 다음, 아파치의 도큐먼트 루트로 옮깁니다. = 설치
cd /usr/local/src
wget https://wordpress.org/latest.tar.gz
tar xvzf latest.tar.gz

cd wordpress/
cp -R ./* /usr/local/apache2/htdocs #  << 모든 파일과 디렉토리를 DocumentRoot 디렉토리로 이동
chown -R daemon /usr/local/apache2/htdocs #  << 소유자를 daemon 으로 변경
WordPress5.2.1 설정
워드프레스(WordPress)용 데이터베이스와 유저를 생성
※ MySQL설정에서 caching_sha2_password를 지원하지 않기 때문에 디폴트 인증 플러그인을 mysql_native_password으로 변경한 후에 작업을 진행하시기 바랍니다
[root@centos7 ~]# mysql -u root -p

Enter password:
Welcome to the MySQL monitor. Commands end with ; or \g.

Your MySQL connection id is 9
Server version: 8.0.16 MySQL Community Server - GPL
Copyright (c) 2000, 2019, Oracle and/or its affiliates. All rights reserved.
Oracle is a registered trademark of Oracle Corporation and/or its
affiliates. Other names may be trademarks of their respective
owners.

Type 'help;' or '\h' for help. Type '\c' to clear the current input statement.

mysql> CREATE DATABASE your-wordpress-database-name;     #  << B를 생성
Query OK, 1 row affected (0.10 sec)

mysql> CREATE USER your-user-id@localhost IDENTIFIED BY ‘your-password';   # << admin유저 생성
Query OK, 0 rows affected (0.07 sec)

mysql> GRANT ALL ON your-wordpress-database-name.* TO your-user-id@localhost;      #  <<  생성한 DB를 사용할 수 있는 권한부여
Query OK, 0 rows affected (0.07 sec)

mysql> \q

Bye
워드프레스(WordPress) 설정 파일 작성
cd /usr/local/apache2/htdocs
mv -i wp-config-sample.php wp-config.php